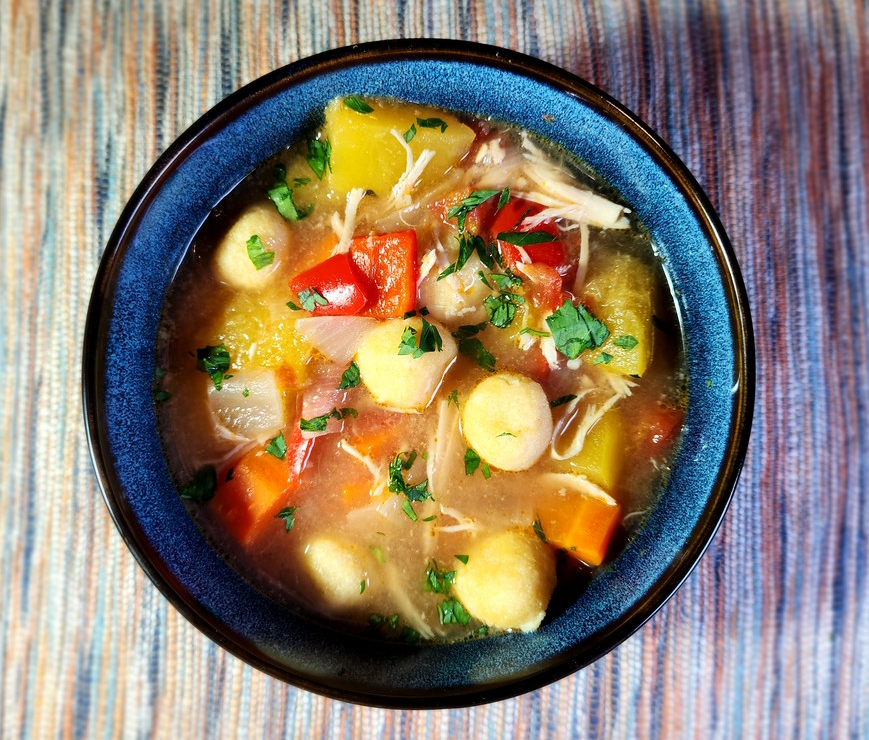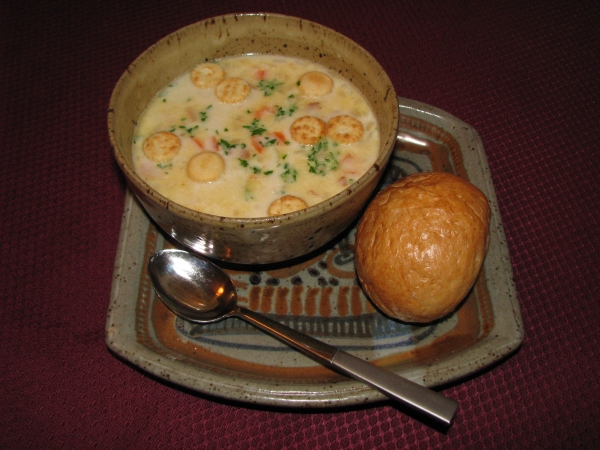
New England Clam Chowder is linguistically—if not culinarily—linked to Native Americans. The clams normally used in this chowder are commonly known as "hard clams" which are differentiated according to their size into, "Little Necks", "Chowder Clams" and "Cherry Stones" . The scientific name for this clam is,Mercenaria mercenaria, Latin for "wages", obtaining this name because of the practice of using clam shells to fashion beads that Native Americans used as currency. In New England, this particular clam is also called a "quahog" which is derived from the Narragansett Indian name for the clam, poquauhock.1
New England Clam Chowder has a venerable history. Not only is it a culinary statement of regional American identity (set against the oppositional tomato based "Manhattan Clam Chowder"), but it also has merited august literary notice. Herman Melville devoted an entire chapter of Moby Dick to this mariner's delight.
However, a warm savory steam from the kitchen served to belie the apparently cheerless prospect before us. But when that smoking chowder came in, the mystery was delightfully explained. Oh, sweet friends! hearken to me. It was made of small juicy clams, scarcely bigger than hazel nuts, mixed with pounded ship biscuit, and salted pork cut up into little flakes; the whole enriched with butter, and plentifully seasoned with pepper and salt. Our appetites being sharpened by the frosty voyage, and in particular Queequag seeing his favorite fishing food before him, and the chowder being surpassingly excellent, we dispatched it with great expedition.
Clam Chowder is relatively easy to make, but like many other kinds of stews and chowders it tastes significantly better the day after initial preparation, once its flavors blend and mellow. There are many variations but the basic ingredients are clams, clam juice, potatoes, bacon and milk and/or cream. While in Captain Ahab's time Clam Chowder was thickened with "hard tack" ship's biscuits, today it is more common to employ plain flour. For those who must restrict their gluten, substituting heavy cream for half the milk and replacing half the Yukon potatoes with russets (which will disintegrate somewhat during cooking thereby thickening the soup) should lead to perfectly acceptable results. A strong dash of white wine also makes a somewhat merrier chowder. To save time and effort, canned clams can be used with excellent results. The following recipe is a basic recipe, there are many variations out there including adding any of the following: celery, celery leaves, thyme, sage, Old Bay Seasoning, cauliflower, corn, garlic, leeks, sherry, white wine, and salt pork (instead of bacon).
Ingredients:
- 5 pounds of fresh quahog/hard/cherry-stone clams or 2 (7 1/2 once) cans chopped or minced clams
- 2 pounds Yukon Gold or round white potatoes, peeled and diced
- 1 yellow onion, finely chopped
- 3 medium carrots sliced and quartered
- 3 slices thick bacon cut into 1/4 inch pieces
- 3 cups milk
- 3 tablespoons all purpose flour
- 3 tablespoons butter
- 2 bay leaves
- 1 teaspoon fresh thyme leaves or 1/4 teaspoon dried thyme
- salt & ground black pepper (to taste)
- several sprigs of finely chopped parsley for garnish
- oyster crackers
Preparation: Using Fresh Clams: (if using canned clams, skip to step 7)
- Scrub fresh clams vigorously and thoroughly.
- In a large pot steam the clams in one cup water for eight minutes until the shells open.
- Remove clams from pot and let them sit until they are cooled enough to handle. Reserve the water the clams were steamed in.
- Over a bowl to catch the clam "liquour" remove the clams from the shell (but not the connective mussle) with a small paring knife.
- Chop clams into small pieces.
- Strain the reserved water from the pot and the liquor from the bowl through cheese cloth to remove any sand.
- Fry the bacon in the empty pot over medium-low heat until the fat renders and the bacon crisps, 5 to 7 minutes.
- Add the onion and cook, stirring occasionally, until softened, about 5 minutes.
- Add the flour and stir until lightly colored, about 1 minute.
- Gradually whisk in the reserved clam broth.
- Add the potatoes, carrots, bay leaf, and thyme and simmer until potatoes are tender, about 10 to 15 minutes.
- Add the clams, cream, parsley, and salt (if necessary) and ground pepper to taste; bring to simmer.
- Remove from the heat, discard the bay leaf, and serve immediately.
At the table allow guests to garnish their bowls of chowder with chopped parsley, additional ground pepper and oyster crackers.
1 Olsen, Stephen, Donald D. Robadue, Jr and Virginia Lee. 1980. An Interpretive Atlas of Narragansett Bay, Rhode Island Sea Grant, Narragansett, Rl.
Recipe by T. Johnston-O"Neill
- Details
- Hits: 4218
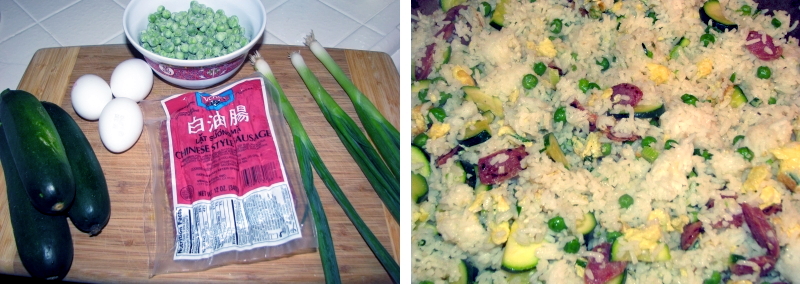
Simple Ingredients Lead to Colorful and Tasty Results! Some form of fried rice can be found nearly anywhere people eat rice. From Nasi Goreng (lit. fried rice) in Indonesia, to Thai Khao Pad to Cuban Arroz Frito to Filipino Sinangag to Hawaiian style fried rice (often with Spam) to Cha Han Japanese fried rice to the many varieties of Chinese Rice
Fried rice works best with day-old rice that has dried and hardened a bit. If you are really pressed for time, cook the rice with a bit less water than usual and the rice will be a bit firmer. It is a good idea to refrigerate rice after it is cooked as cooked rice is a great medium for bacterial growth. Uncooked rice--if kept dry--lasts practically forever. Long grain white rice is preferred, but Jasmine rice also works. Japanese and Basmati rice are less than suitable.
The Chinese sausage, know as Lap Cheong or La Chang is usually made with pork. It is possible to find Chinese sausages that are a mixture of pork and chicken, but they are not as flavorful. Chinese sausages can be found in almost any Asian grocery store. It keeps well in the refrigerator or freezer.
The following recipe is somewhat minimalist with regard to ingredients. Fried rice is often made with left-overs so the options are plentiful. Other than the peas, frozen vegetables should be avoided. Possible additions are: shrimp, shredded or diced pork or chicken, carrots, bean sprouts, snow peas, green beans or whatever else you have on hand. For best results, each ingredient should be cooked separately so that the flavors do not blend. Some recipes call for chopping or dicing the Chinese sausages, but we prefer slicing.
Many thanks to Lu Ping for sharing this recipe with me so many years ago. It has become a family favorite; easy to make and delicious.
As always, it is a good idea to measure, slice ingredients and keep them in separate bowls before you begin cooking.
Ingredients:
- 4 Lap Cheong sausages sliced diagonally (1/8 to 1/4 inch slices)
- 4 Eggs
- 8 cups of day-old rice
- 2 cups of frozen peas
- 4 sliced scallions, use both white and green parts (discard root and very
top of the green part) - 4 cups of quartered and sliced zucchini
- 1/4 cup of peanut oil
- soy sauce
Preparation:
- Cook 4 cups of rice. Fluff rice and refrigerate for one day (see comments above)
- Slice Vegetables and Sausages
- Beat eggs in a bowl, but do not whip
- Add sliced scallions to beaten eggs and mix
- Add 1/4 cup of peanut oil to wok and heat until oil is very hot but not yet smoking
- Carefully add egg and scallion mixture to wok
- Cook until eggs just start to brown and then flip "omelet" over and cook briefly (20 seconds or so) and then remove eggs and return to bowl
- Add Chinese sausages to wok, moving the pieces briskly about to keep them from burning
- When sausage pieces just begin to crisp, remove them and set them aside in a bowl
- Turn down heat under the wok to medium high
- Add peas and a little water (no more than a 1/4 cup), cover and cook for one minute
- Remove cover and add the remaining vegetables
- Cook while moving vegetables until they are about half-cooked (about 2 minutes)
- Turn heat up to high, add rice and mix everything in the wok thoroughly. Keep everything moving!
- When rice is hot, add egg omelet and fold into the fried rice. The omelet should break into small clumps.
- Mix in cooked sausage
- Serve in individual bowls
At the table, soy sauce can be added according to individual taste. To add some kick you can season your fried rice with red chili flakes or Lao Gan Ma Chili Sauce (with or without peanuts).
Recipe and photos by Shari K. Johnston-O'Neill
- Details
- Hits: 3284
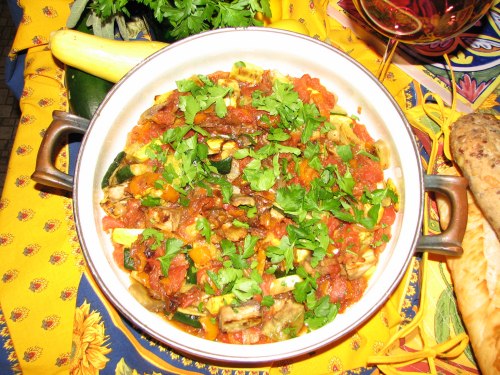
Ratatouille is signature dish of the the Provence region of southeastern France. The word ratatouille is derived from the verb touiller which means "to stir up." The dish is tremendously popular throughout France because it is easy to prepare, uses abundantly available ingredients, and can be served cold or warm.
The Provence region lies along the Mediterranean Sea just west of Italy. Provence's diverse topography is characterized by mountains, valleys, and beautiful beaches. (Sound familiar, San Diegans?) Originally a Greek colony, Provence was once a part of the Roman Empire and was eventually incorporated into France in the 15th century.<
The region's warm weather, coastal location, and the impact of other Mediterranean culinary influences has produced a cuisine at odds with stereotypical notions of French food. The Provencal cooking is more akin to neighboring Italy than to the rest of France.
It is said that there are three foundations to Provence cuisine: olive oil, garlic, and aromatic herbs (such as herbs de Provence). This makes ratatouille a quintessential Provencal dish
Our recipe and preparation follow the notion that in order to “do ratatouille right,” the component flavors should not be mixed and muddled. The vegetables should be cooked separately and then arranged in layers so that each will retain their distinct flavors.<
The following recipe is was adapted from "Mastering the Art of French Cooking" by Simone Beck, Louisette Bertholle, and Julia Child.
Ingredients
- ½ pound eggplant
- ½ pound zucchini
- 1 tsp. salt
- 4 tablespoon olive oil, more if needed
- ½ pound (about 1 ½ cups) thinly sliced yellow onions
- 2 (about 1 cup) sliced green bell peppers (orange peppers were used in this preparation.)
- 2-3 tablespoons olive oil, if necessary
- 2 cloves mashed garlic
- 1 pound firm, ripe, red tomatoes, peeled, seeded and juiced to make 1 ½ cups pulp
- 3 tablespoons minced parsley (Italian parsley used here.)
- Salt and pepper to taste
Preparation:
- Peel the eggplant and cut into slices 3/8 inch thick, about 3 inches long, and 1 inch wide.
- Place in a bowl and toss with salt. Let stand for 30 minutes. Salting and rinsing—"known as "degorging"—will soften and remove much of the eggplant's bitterness. Eggplant is capable of absorbing large amounts of cooking fats and sauces, allowing for very rich dishes, salting process will reduce the absorbtion of oil absorbed.
- Scrub the zucchini, slice off the two ends, and cut up like the eggplant.
- Place in a bowl and toss with salt. Let stand for 30 minutes.
- Drain the eggplant and zucchini slices and dry them on a towel.
- One layer at a time, sauté (for about one minute) the eggplant in hot olive oil. When lightly browned on each side, remove from pan and set aside. Sauté the zucchini in a similar fashion.
- In the same skillet, cook the onions and the peppers slowly in olive oil for about 10 minutes, or until tender but now browned. Stir in the garlic and season to taste.
- Boil a small pot of water and immerse the tomatoes for about 10 seconds. Remove, cool, and peel off the skins.
- Slice the peeled tomatoes through the center, and gently squeeze them over a bowl to extract the juices and seeds. Slice the juiced and seeded tomatoes into 3/8 inch strips. Lay the sliced tomato pulp over the onions and peppers. Season with salt and pepper. Cover the skillet and cook over low heat for 5 minutes, or until the tomatoes have begun to render their juice. Uncover, baste with the juices, raise heat and boil for several minutes, until juice has almost evaporated.
- Place a third of the tomato mixture in the bottom of a heavy casserole pot (the recipe calls for a 2 1/2 quart fireproof casserole about 2 1/2 inches deep) and sprinkle over it 1 Tb. of parsley.
- Arrange half of the eggplant and zucchini on top, then half the remaining tomatoes and parsley. Put in the rest of the eggplant and zucchini, and finish with the remaining tomatoes and parsley.
- Cover the casserole and simmer over low heat for 10 minutes. Uncover, tip casserole and baste with the rendered juices Correct seasoning, if necessary. Raise heat slightly and cook uncovered for about 15 minutes more, basting several times, until juices have evaporated leaving a spoonful or two of flavored olive oil. Be careful of your heat; do not let the vegetables scorch in the bottom of the casserole.
- Set aside, uncovered, and reheat slowly at serving time, or serve cold.
Bon Appétit
Text by David Craven
Photos and dish preparation by Pattie Anderson
- Details
- Hits: 3385
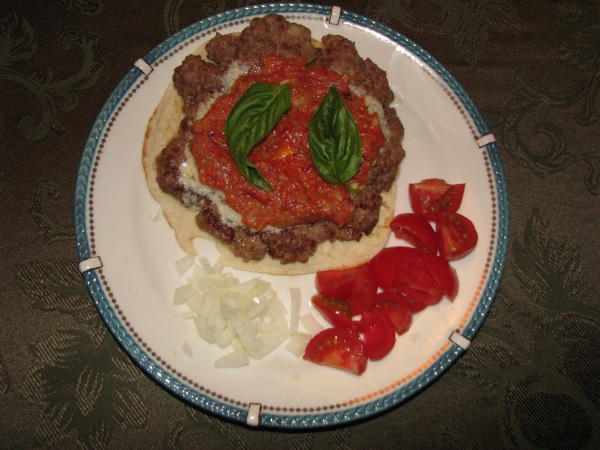
This month's recipe selection coincides with our book of the month, the Tiger's Wife, whose story is set in the Balkans.
America is considered the land of the burgers, but dining denizens of Serbia, Croatia, Slovenia, Herzegovina, Montenegro, Bosnia, Macedonia, and more recently Germany and Austria might take issue. Pljeskavica, being derived from the Serbian word for clapping hands, are meat patties with an attitude. Typically much larger than an American burger, Pljeskavica are a mixture of onions, paprika, garlic and one or more kinds of ground meat. Like hamburgers, the preferred method of cooking is grilling. Their distinctive taste is developed by mixing and then refrigerating the ingredients for several hours so that the flavors can meld. As the ingredients need to be refrigerated for several or more hours, a bit of time management and planning is requisite.
There are many regional variations in ingredients and Pljeskavica are served; all by themselves on a plate, in buns like their American cousins or between thick flat breads known as Lepinja (pitas are a handy substitute). Chopped tomatoes or onions can be served alongside (or as toppings). a popular side dish is Serbian Potato Salad which employs oil and vinegar rather than mayonnaise or sour cream.
Pljeskavica are also often served with Ajavar (aka Serbian Salsa) and/or Kajmak (a rich and creamy dairy topping). These condiments can also be served on the side or as toppings. Ajavar might be able to be found in specialty market, but freshly made from scratch is best if you want the full flavor. Ajvar can be eaten in a variety of ways, on toasted garlic bread, on salads or sandwiches, atop grilled fish, with pasta, with meats (particularly grilled meats and kabobs), and whatever else that might do with a exquisite blast of zesty flavor.
Pljeskavica Ingredients:
- 1 pound ground beef
- 1/2 pound ground pork
- 1/2 pound ground lamb
- 1/2 cup finely chopped onions
- 1 1/2 teaspoons salt
- 2 teaspoons sweet paprika
- 1 teaspoon black pepper
Preparation:
- Mix ingredients in a large bowl.
- Cover bowl and refrigerate for 3 hours or more (overnight is best).
- Form mixture into large round thin patties. (typically Pljeskavica are of a much greater diameter that American hamburgers. Rolling the ground meat into handful-sized balls and then flattening them between two pieces of waxed paper or plastic wrap (the paper works better), will allow you to achieve the proper size. Transfer the patty to the pan by flipping the bottom sheet of paper over into the pan. If you desire to eat the Pljeskavica between a split pita, cooked they should be the size of the pita.
- Refrigerate patties for another hour to firm them up.
- Grill (or fry) the Pljeskavica to your favored level of doneness.
Serve Pljeskavica burgers with Ajavar salsa, Kajmak (or creamy yogurt), a side of vinegar and oil based potato salad, french fries, tomatoes (chopped or wedges), chopped onion or whatever other condiment or side-dish that your taste buds desire! They can be eaten "hamburger style" but serving them between warmed split pita bread.
AJVAR
Ingredients:
- 6 red bell peppers
- 1 medium eggplant
- 6 unpeeled cloves of garlic
- 1/2 cup of olive oil
- 1 teaspoons of white vinegar or lemon juice
- Salt and pepper, to taste
- 1/4 teaspoon of red chili flakes
- a couple of basil leaves for garnish
Preparation:
- Place oven rack in the middle position and preheat oven to 475 degrees. Halve each pepper, discarding stems and seeds. Place peppers, cut side down, on a baking sheet.
- Cut eggplant in half lengthwise, score with a knife and coat with 1 tablespoon of olive oil, salt it lightly and place the two halves on the baking sheet. Place the 3 unpeeled garlic cloves on the side of the baking sheet that will be closest to the oven door.
- When oven reaches temperature, put the baking sheet in the oven the bake for 10 minutes and then remove the garlic cloves.
- Continue baking the red peppers and eggplant for another 20 minutes, until the skins have turned black. Please note that eggplant skins may blacken before the red peppers do. If this happens remove the eggplant first and continue baking the peppers.
- After you remove the garlic from the oven, let it cool to touch. Peel the skins off the cloves and chop the garlic finely.
- When the peppers are fully roasted, remove them from the oven and immediately place them in a bowl. Cover the bowl with a clean dishcloth or plastic wrap and let sit for 10 minutes. This will make the peppers easier to peel. When cool, peel the blackened skins off the peppers using a small knife.
- With a large spoon remove the pulp of the eggplant, discard the skins. Chop the eggplant pulp coarsely.
- Put the eggplant, peeled peppers, salt, pepper, vinegar, chopped garlic, chili flakes and the remaining olive oil in a food processor. Pulse the mixture until somewhat smooth but do not puree it, it should be a little bit lumpy.
- Pour mixture in to a serving bowl and garnish with fresh basil.
- Serve ajvar with toasted bread slices drizzled with olive oil.
Kajmak
Kajmak can be enjoyed as an appetizer or as a condiment. It is very commonly eaten with Pljeskavica and other grilled meats. in Turkey fresh Lepinja bread filled with Kajmak along with preserves or honey is a favored breakfast treat. Kajmak is definitely not for people who have to conscientiously watch their fat intake.
Ingredients:
- 1 quart of heavy cream
Preparation:
- Pour cream into a large saucepan
- Bring cream to a low simmer (just bubbling)
- Simmer for 1 hour
- Every few minutes, take a ladleful off the top of the simmering cream, hold the ladle very high above the pan and then poor its contents back into the sauce pan. Please note: BE CAREFUL when you do this, you don't want to burn yourself and you don't want to make a mess of your kitchen. It might take a wee bit of practice to get the right motion to do this well. All the recipes that I consulted include this step, but without explanation. It may have some beneficial effect with regard to thickening, but when I made the Kajmak I quickly discovered one good reason. Getting the simmering temperature just right is a bit of a challenge, you want the cream to just start bubbling. Regardless, due to some unknown (at least to me) inner workings of heat and cream, in a few minutes the cream will very rapidly decide to rise up and overflow the pot (putting new meaning into the adage "the cream always rises to the top"). the ladle trick seems to cool the mixture just enough to prevent this from happening. If you watch the pot early on you should be able to gauge the frequency you need to employ the ladling in order to prevent your stove from being anointed with boiling cream.
- After simmering for an hour, pour thickened cream into a bowl, cover and refrigerate over night.
- The following day the Kajmak will be fully congealed and ready for use. Similar to butter in consistency, it retains its creamy essence and tastes a good deal less oily than butter.
Уживајте!(Enjoy!)
Recipes by T. Johnston-O'Neill
Photos by Shari K. Johnston-O'Neill
- Details
- Hits: 3695
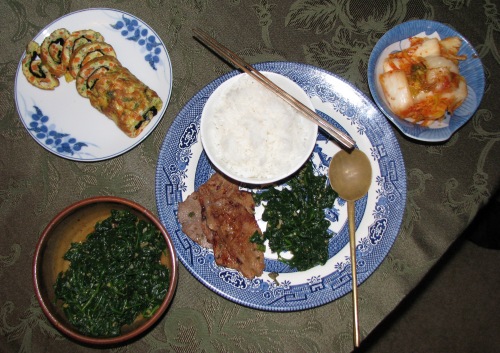
Traditional Korean meals consist of one or more main dishes and a 2 to as many as 20 side dishes known as banchan. The most well-known Korean side dish is kimchi. While spicy, pickled and fermented cabbage is the most popular form of kimchi, the Kimchi Field Museum in Seoul has documented 187 historic and current varieties of kimchi. Most kimchi uses some form of cabbage, radish or cucumber. Traditionally kimchi was fermented in large ceramic pots which were buried in the ground for moths. While it is possible to make your own kimchi, it is a long process (particularly if it fermented), so most folks just buy it at the store. From type to type and brand to brand there is a great deal of variation in the taste (and level of fermentation) of kimchi, if you try one that does not suit your taste buds, try another. Highly fermented kimchi might, for some, be an acquired taste but some Korean's eat it for nearly every meal.
The are a very large number of dishes that can be enjoyed as bachan (side dishes). We have listed two below, a Korean style omelet, and a spinach dish, but the pa jun we featured in a previous recipe of the month would be a suitable addition.
Bulgolgi
Bulgolgi, often referred to as "Korean BBQ", is spicy and sweet marinated meat that is grilled on a Korean-style grill. A smaller home version of a Korean grill can be purchased in either a Korean grocery (like Zion Market) store. It can be used on a gas stove or you can purchase an inexpensive butane burner (also widely available at Asian markets.) which makes the whole affair quite portable, perfect for a picnic! Given proper ventilation, you can set up the butane burner on your dining table, Bulgogi is delicious directly off the grill. Bulgogi is usually served with green leaf lettuce which is wrapped around the bulgolgi so that it can be eaten with the fingers. A typical condiment to spice the cooked meat is Korean red pepper paste (kochujang).
Gaeran Mari (Rolled Omelet)
Gaeran Mari is easy to make and looks fabulous on the table. In addition to being served as a side dish, it can also be eaten for breakfast, just like any other omelet. The toasted seaweed really sets gaeran mari apart from other omelets.
Ingredients:
- 3 eggs
- 1 scallion (green onion), finely sliced
- 1 small carrot, finely chopped
- 1 sheet Korean roasted seaweed (gim), Japanese nori works fine.
- salt and pepper to taste)
- olive oil for cooking
Preparation:
- Mix eggs with whisk or fork and add onions and carrots until well combined.
- In a lightly oiled sauté pan, pour egg mixture and heat slowly over low heat.
- Heat slowly for a few minutes until almost cooked through, then place seaweed sheet on top of omelette.
- Roll omelet into a tight roll by lifting side with spoon or baking spatula.
- Let omelet rest for a few minutes to cool.
- Slice into 1 inch pieces and serve on medium sized plate with cross-sections showing.
Sigumchi Namul (Seasoned Spinach)
Ingredients:
- 1 pound thoroughly washed spinach
- 3 tablespoons soy sauce
- 1 tablespoon sesame oil
- 1 tablespoon sesame seeds
- 2 cloves finely chopped garlic
- 1 teaspoon sugar
Preparation:
- Blanch the spinach in boiling water for 30 seconds.
- Remove spinach quickly and rinse in cold water.
- Gently squeeze the spinach to remove excess water.
- Mix soy sauce, sesame oil, seeds, garlic, and sugar together and then blend into the cooked spinach.
- Serve in a small side dish
Enjoy!
Recipes by T. Johnston-O'Neill
Photos: Shari Johnston-O'Neill
- Details
- Hits: 4600
Joomla!
Extensions
The Joomla! content management system lets you create webpages of various types using extensions. There are 5 basic types of extensions: components, modules, templates, languages, and plugins. Your website includes the extensions you need to create a basic website in English, but thousands of additional extensions of all types are available. The Joomla! Extensions Directory is the largest directory of Joomla extensions.
Components
Components are larger extensions that produce the major content for your site. Each component has one or more "views" that control how content is displayed. In the Joomla administrator there are additional extensions such as Menus, Redirection, and the extension managers.
Modules
Modules are small blocks of content that can be displayed in positions on a web page. The menus on this site are displayed in modules. The core of Joomla! includes 24 separate modules ranging from login to search to random images. Each module has a name that starts mod_ but when it displays it has a title. In the descriptions in this section, the titles are the same as the names.
Content Modules
Content modules display article and other information from the content component.
User Modules
User modules interact with the user system, allowing users to login, show who is logged-in, and showing the most recently registered users.
Display Modules
These modules display information from components other than content and user. These include weblinks, news feeds and the media manager.
Utility Modules
Utility modules provide useful functionality such as search, syndication and statistics.
Navigation Modules
Navigation modules help your visitors move through your site and find what they need.
Menus provide your site with structure and help your visitors navigate your site. Although they are all based on the same menu module, the variety of ways menus are used in the sample data show how flexible this module is.
A menu can range from extremely simple (for example the top menu or the menu for the Australian Parks sample site) to extremely complex (for example the About Joomla! menu with its many levels). They can also be used for other types of presentation such as the site map linked from the "This Site" menu.
Breadcrumbs provide users with information about where they are in a site.
Page 19 of 28


